Wednesday, 19 January 2011

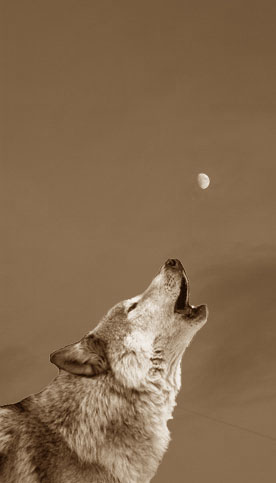
Photoshop sepia.

I am going to show you how I created an image in sepia from an image this is colour, it was easy to do and was done in a few simple steeps. I am going to do a steep by steep guide on how I achieved the effect.

1: First open the image that you want in Photoshop. Then you need to turn the image black and white by going to                 Image - Adjustments - Desiderate. 
   

2: We then need to open the colour balance box by going to   Layer – New adjustment layer- Colour balance.

3: With this box open we need to bring the red up and the yellow down creating the desired effect. You can move the numbers until you are happy with the finished effect but I found the best number to be as follows. Red 43, Green 0, Yellow -43.

I used Photoshop CS5 for this image.
Moon my own image. 
Wolf from http://www.google.co.uk/imgres?imgurl=http://www.top-dogs-names.com/images/wolf-howl.jpg&imgrefurl=http://www.top-dogs-names.com/list-of-dog-names-male-ef.html&usg=__scPnn-OSKG_m8FYZ0sCAKbIMqb8=&h=390&w=450&sz=27&hl=en&start=0&sig2=g5HqVq-vZOqJQHItPiwosQ&zoom=1&tbnid=nzvCBPLPyPpmCM:&tbnh=127&tbnw=142&ei=cNg2TYOfAoGHhQeb-dipAw&prev=/images%3Fq%3Dhowling%2Bwolf%26um%3D1%26hl%3Den%26sa%3DN%26rlz%3D1G1TSEH_ENUK384%26biw%3D1345%26bih%3D562%26tbs%3Disch:1&um=1&itbs=1&iact=rc&dur=232&oei=cNg2TYOfAoGHhQeb-dipAw&esq=1&page=1&ndsp=26&ved=1t:429,r:22,s:0&tx=69&ty=75

Saturday, 15 January 2011

Write up of studio work.

I am going to write up the work that I have done in the studio on my 6 final shots, I am also going to put up the best images form that session and out of a certain image I have a few but not sure what one is the best to use for my final images.

1. First we have the image of the 'giving of orders', I wanted this piece to be rather dark as the job depicted is a rather dark one, it depicts a commander giving his men the orders to go to war and die for there country. I wanted this image to have dark shadows and shadows on the face; I achieved this by having only on light on in the studio. I used one light with a honey comb diffuser and barn doors to direct the light. The light was then brought down to ground level and pointed up at the subject to cast light up at the face but keep the rest in shadow, I also turned down the light to create more shadow in the image. The first few shots that I tried to do were done with the one light at the front and the two lights with the soft boxes on at the back of the subject and all three where turned down low. This did not give me the right effect so that is when I tried using only the one light.  


Camera: Canon E05 50, 25-105mm lens.
Settings:  F7.1
           1/60S
           ISO 100
           Zoom 65mm

First image (did not like so changed lighting)
Next images (Not sure what one to use as final, I like the first one.)


2. Next I have the image of 'the solder returned from battle', I wanted this image to be light and bright to show happiness, I did not want it to be dark at all as this is not what the image is about. I used the two lights with soft boxes on in the back ground to make the back of the image totally white; on the subject I used the light with the soft diffuser on to cast a soft light on to the subject mainly the face area. All three lights were turned up to full to give the right brightness of light.


Camera: Canon E05 50, 25-105mm lens.
Settings:  F7.3
           1/65S
           ISO 100
           Zoom 65mm

(Not sure what image to use.)

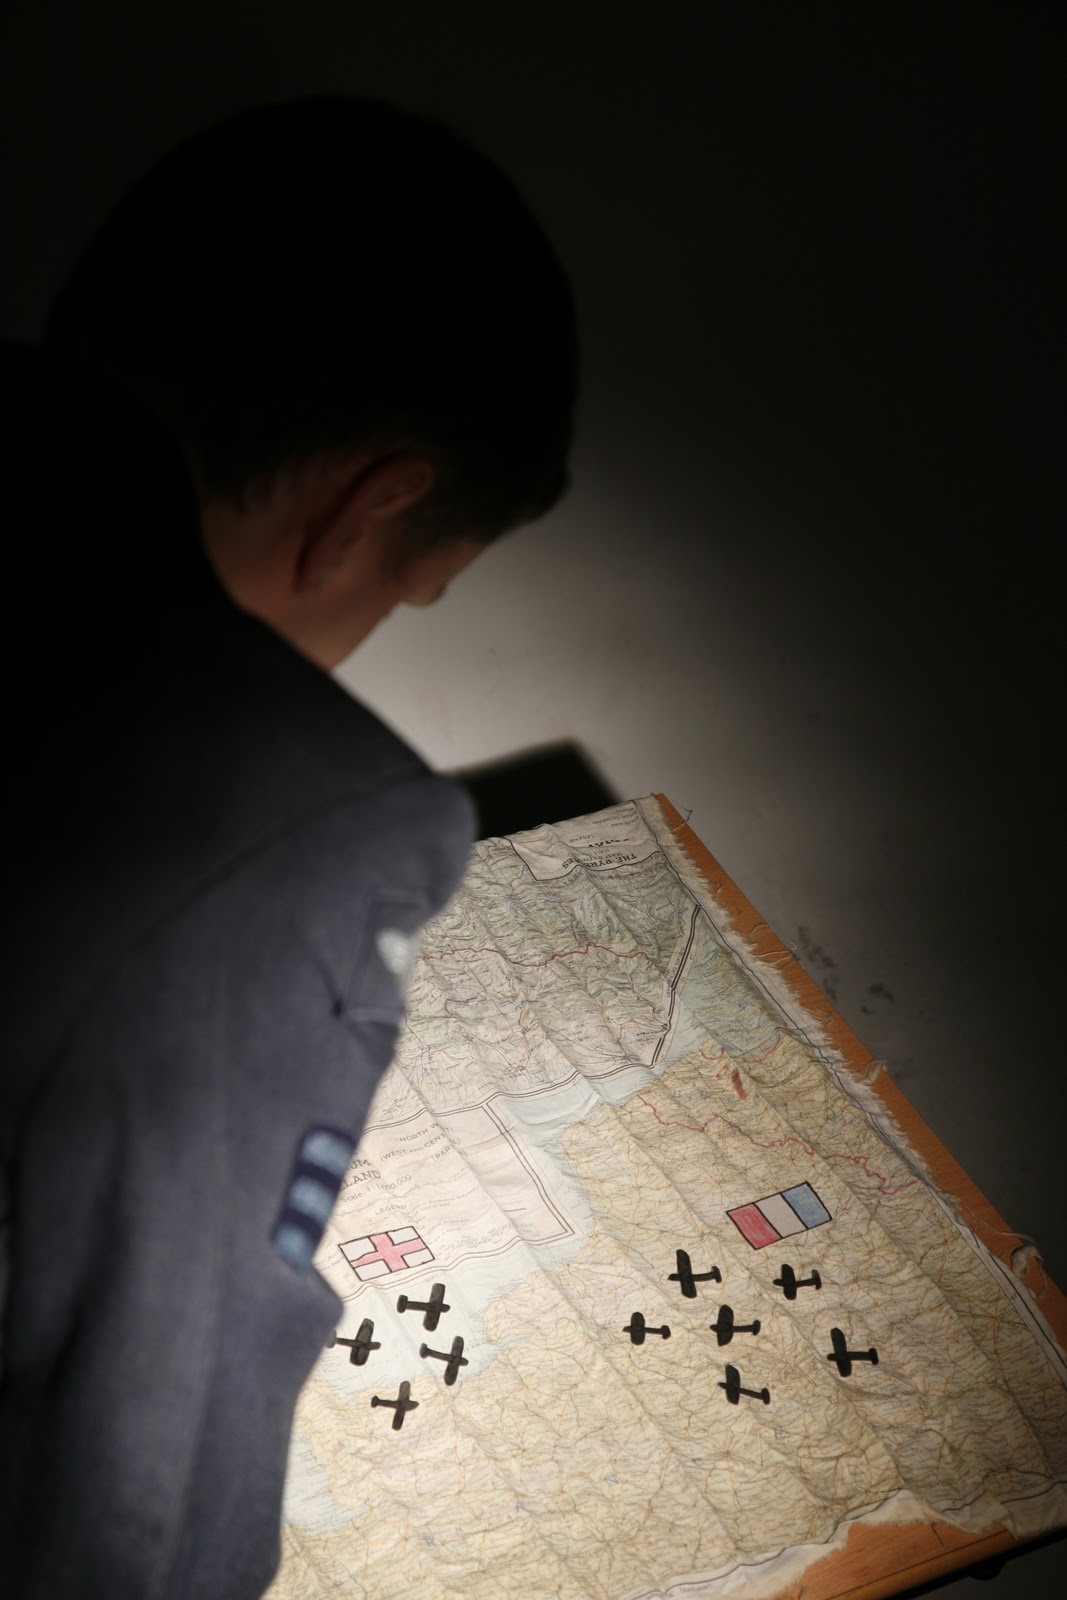
3. My next image is the 'planning of a mission'. I did this shot a few times with different lighting and I am not sure what one I like best. For the first shots I made the image a lot darker and with more shadow. I focused the light solely on to the map as that is the main focuses of the image so the human subject can been seen but its not totally in light and is not the main focuses of the image. I created this effect by using only one light with the honey comb diffuser on and the barn doors to focuses the light on to the map and a little bit of it on to the human subject. I turned the light down and had it high in the air pointing down at the map. I also took the image from the same height as the light to make it look like you are looking down on the scene.

The last image I made the scene a little lighter by adding one light with the soft box to the right of the image and had it turned down to very low. In this image you can see more of what’s going on and both map and human subject are in view. I like the fact that you can see everything in the image but I feel that it takes away some of the atmosphere, that the first images manage to keep.


Camera: Canon E05 50, 25-105mm lens.
Settings:  F7.1
           1/55S
           ISO 100
           Zoom 40mm

(Not sure what one to use.)


4. This image is one I tried to recreate from an image I found a while ago. I tried to make the lighting look as dark and grainy as possible, I used the light with the soft diffuser on facing the subject and behind the subject left and right I used the lights with the soft boxes on. I turned the levels down to just under half to give that dank grainy look in the lighting. Next I had to focuses the camera on the phone and had to do it manually as it would not autofocus as the subject of the phone was to dark for it to focuses. The first image focused on the person but I rather liked the look of it yet the second two images focused on the phone and that is the look I was going for. A recreation of the image I found. Yet again I am not sure what one I like the most, the last two are a recreation of the image yet the fist I like the feel of as it feels more like a phone call not a staged shot.

Camera: Canon E05 50, 25-105mm lens.
Settings:  F7.0
           1/50S
           ISO 100
           Zoom 35mm


5. This was my hardest image to do as I was not sure how to get the desired effect, that effect being a silo wet of the subject. I managed to achieve the effect rather easily after a few goes with different lighting set ups. In the end the right set up was having the two lights with the soft boxes on only and having there light setting down very low. This meant that it would only light up the back wall and not the subject keeping the subject in total darkness creating the silo wet. I could not get the wall totally white as that would have meant turning the lights up and that would in turn illuminate the subject so they would no longer be in silo wet. So I had to compromise and have the wall dark and shadowy, I rather liked this effect as it gave the image more depth and a sadness that fitted the images theme well, that is the 'loss of a fellow solder'.


Camera: Canon E05 50, 25-105mm lens.
Settings:  F7.1
           1/60S
           ISO 100
           Zoom 24mm


6. This is my final image and was not in my planning as it was a quick change after one of my images did not come out how I planed it. This image depicts the blood on a commanders hands, the loss of life at there command. It was a rather easy shot to do but I had to make sure the blood colour was rich and stood out on the hands. I did this by having the lighting levels rather high. I used the front light with the soft diffuser on pointing down at the hands and the two lights at the back with the soft boxes on, all three lights were turned up full to give the maximum amount of light on the subject. This caused the blood to come out a rich red colour. I also got my target to lift there hands so it gives you the feeling that you are looking at your own hands.

Camera: Canon E05 50, 25-105mm lens.
Settings:  F7.5
           1/65S
           ISO 100
           Zoom 30mm

(Not sure what image to use.)


This is the image that I was not happy with but I have decided to put it up to show my working and my reasons for why it has not made it to my final six. For one I could not get the light levels or settings right and it was fare to dark. I also thought that the theme its self was rather weak and not as serous and as thought provoking as the other ideas that I had. I also thought that it just looked rather tacky and was very weak compared to my other images.


Camera: Canon E05 50, 25-105mm lens.
Settings:  F7.1
           1/60S
           ISO 100
           Zoom 65mm


Change of idea.

After doing my shot for my final 6 images I found that I did not like how one turned out, that one was ‘Army vs RAF’. I found that the image just looked tacky and I was not happy with its over all content. So I went away and came up with another idea. That idea is a rather simple one but has a lot of meaning. It is a simple image of someone’s hands with blood on them. The image is titled ‘The blood on my hands’. Its goal is to represent the blood that is on some people hands, the people who give out the orders to kill be those orders to protect innocent lives or in evil deeds.

Saturday, 1 January 2011

Ideas 4 edited images.

I have also drawn my edited images so that I have an visual idea of what I want when I come to editing my images together. I find it easer to work with a visual add in the compassion.

1.  


I have loved this shot from a TV show for years and really want to recreate the image but instead of it being a sci-fi image it will be a war one. The person will be in uniform and in the sky there will be planes. (I am hoping spit fires.)

Lighting: I will shot the image in very bright and light that will create a shaper image of the person, I will do it against a white background so that the person is very easy to edit as all you have to do is remove the white background from the images. 

Equipment: I will have to use the camera freehand to get the angle I want looking up from behind the person, also a light meter to get the base levels for the image then adjust as needed. 

Props: RAF uniform. 

Editing ideas: I will have to find a stock image of the spitfires as I cant sadly get images of spit fires flying, this is an easy enough edit taking one images and laying it over another. Then I will have to play with the settings of both images so that they match in colour and contrast. 

2.

I got this idea after watching a film, what if Hitler never started World War Two? What would have happened if he was killed before starting war? This image depicts that possible scenario.

Lighting: Again this will be done on a white background so it will be easy to lift the person off it to transplant on to the other image. It will be done with again bright light.

Equipment: I can put the camera on a tripod for this image and reduce all camera shake and blur; also the light meter will be used.

Props: All black, ski mask, gun.

Edit ideas: Again I will have to use a stock image of Hitler, I will merge both images and play around with contrast and colour to get them looking almost the same. I will then turn the whole image black and white. I will do this as any image of Hitler will be black and white where mine will be colour.


3.


I got this idea after watching another film titled 'love the bomb' I liked the idea of that title and decided to do an image around that.

Lighting: Again it will be the same as the others all done on white to make it easy to edit in the bomb.

Equipment: I will again put the camera on a tripod to stop blur and use a light meter.

Props: Women in RAF uniform, no jacket.

Edit ideas: I have found a place were I can get a photo of a bomb so both images will be done by me. It might be hard to get the light on the bomb image the same as on the studio shot so I will have to try to sort that out in Photoshop. I am also toying with haveing the words 'Love the bomb' at the top of the image.  

4.


I wanted to have a least one of my images to have the feeling of movement in it so I came up with the idea of someone being blown back in a bomb blast.

Light: It will be the same as the others above, all done on white so its easy to edit the person out of the image and move them to another.

Equipment: I will be using a fan on the person in the shot to get there hair to fly back like they have been hit with an explosion, also the camera will be on a tripod to reduce any blur from hand shake and again a light meter will be used.

Props: Any cloths will be fine for this image, fan for hair movement.

Edit ideas: I will be going out and getting a town shot or preferably a broken down building for my back ground and the blast I will recreate on Photoshop with a smoke tool that you can download.

Ideas 6 themed images.

I have decided to draw my final ideas so that I have a guide of what I am going once I get in to the studio, this will mean I have more time to set up the shots and get the perfect image as I wont be spending time thinking of composition as that is already set out on paper, along with a rough idea of how I wish each shot to be light.

6 Themed Shots.

1.
There is one shot that I found a few years ago and I liked it so much that I wish to try and recreate it in the studio.


For this shot the main focuses is the phone so the officer in the back ground will be blurred and the phone will be sharp, this can be achieved by focusing the camera on the phone and then changing the settings such as f-stop and shutter speed to get the right look.

Light: I want to try and get the light the same as in the photo, it has a rather dark and dingy feel to it but does not intrude on the quality of the image or make any parts of the image dark. I am contemplating maybe using a coloured gel to give a cold atmosphere to the lighting.

Equipment: I will use a tripod to keep the camera steady to make sure the back ground is not to blurred and the phone is fully sharp and has no blur at all from hand shake. I will also use a light meter to check my light levels then adjust the camera until I am happy with the final shot.

Props: Table, Phone, Army or RAF uniform (with cap).

2.
This shot came from the idea of a returning solder, and there loved one opening the door to see them for the first time after a long struggle at war. Under the arm is held the cap that matches the uniform.

Light: I wish to have this done is very soft light and a gentle colour maybe a nice warm yellow, to depict happiness and joy at the return of a loved one.

Equipment: I want to use both soft boxes and the light diffuser to give a nice gentle soft light to the person in the shot, also a light meter to get the right levels for the camera then adjust as needed.

Props: Flowers, Army or RAF uniform (including cap)

3.


I got this idea after I talked to a friend who is in the army and they think they are better than the RAF. I thought it would be nice to have a funny image that could depict war. Hear we have a play fight between someone in an RAF uniform and one in an Army uniform holding a pretend gun and trying to shot down the RAF person, who  is depicting a plane.

Light: I want to have this image as sharp as possible so I will be using the soft boxes on full and not using the soft filter but an unfiltered light. I want the back ground to be as white as I can get it.

Equipment: I will use a tripod to keep the camera steady as I do not wish to get any blur from handshake or any movement, also a light meter to get the right light settings then adjust until happy with the final shot.

Props: RAF and Army uniforms, flight goggles for the RAF uniform.

4.

I got this idea after watching a film were they were in a war room and giving out orders to fighter planes and plotting there movements on a huge map. The shot will be done from above the person and over the shoulder to look down at the map and get a little bit of the person in shot, mainly there shoulder and head (from behind).

Lighting: I want the lighting to be very low level and shadowy to depict the gloom of what theses people had to face when in a real war situation. I am thinking to have one light source pointing down over the shoulder of the person almost in the same position as the camera.

Equipment: I will need a ladder in witch to get high enough to take the shot (must have a person footing it). A light meter to get the initial settings then change them as needed.

Props: Table, Map, little planes, two flags of different countries, RAF uniform.

5.


 This image depicts the giving of grave orders by a commander to his men on the eve of battle, I want the image to be rather dark and full of shadow to show the mood of the image as grave and dark.

Lighting: I want this image to be full of shadow and the background behind the officer to be almost black, maybe a little grey, I want the officers face to be heavy in shadow maybe only seeing the eyes. I want to try lighting it from down to up to cast shadows up the face. Maybe even the other way around, as I am not sure what effect would look best.

Equipment: I will use the camera free hand as I want there to be a bit of an angle looking up at the officer, again I will use the light meter as a bases for my settings.

Props: Table, Army uniform, army cap, phone.

6.


I came up with this idea of a solder graving for his lost comrade in arms. He/she is sat at the grave of there fried holding there dog tags. I want all of the image to be in silo wet and have a shocking white background

Light: I want the whole image to be in silo wet and the background to be white.

Equipment: A tripod to keep the camera steady to stop handshake and blur to keep the silo wet as crisp as possible, equipment needed to do the silo wet and a light meter to get the base settings.

Props: Army uniform, dog tags, wooden cross, box, shotgun.

Wednesday, 24 November 2010

People (event)

I decided to take my camera to an event to try out taking shots of people who were not posing and with different forms of lighting. The main problem that I had was I used the flash on the camera to give me the best shot but due to the low level lighting at the venue I got a lot of red eye. I managed to clean some of this up by using an on line program: PICNIK. I also used the same program to lighten some of the images as they were a little dark. I also used auto for most of the shots because I found while I was using the camera on manual that I was taking most of the time playing with the settings and missing some good shots. So I stuck for the moment with auto and cleaned them up later on. I used my Sony a200 camera with my zoom lens (60-300). With this lens I was able the stand at the back of the room and zoom in on to the person I wanted to photograph. By doing this I was able to zoom past people in the audience and get a clean shot of my target. I think next time I will try to use the Aperture priority setting as this works a little better in low level lighting.

Wednesday, 10 November 2010

Edit test.

I though I would have an experiment with editing before I undertake one of the main projects for this course. The first image of the gun is one of my own taken at a car show were there was lots of army cars. The background and the image of the soldier and the dog all came from the internet.


First of all I had to delete the backgrounds on the images of the car and the solder. I used the eraser tool on Photoshop and went around every part of the image slowly, basically cutting it out. Once I have done that I opened up the image of the background and added the two other images on to the background image as two different layers. Now I had 3 layers on the image. I then placed the background image on the bottom layer the solder on the second layer and the car on the top layer. This meant that the background would be behind both images and the solder would be behind the car.

I then had to re size the solder to make sure he was in proportion to the car. Once done I saved the whole images as a merged image.